With Checkly, we can use Playwright to create monitors that verify page content by checking for keywords.
While basic uptime monitoring tells you if your site is running, it can’t tell you if your most critical content is actually visible to customers. Monitoring for keywords or content in a user-interface can help extend coverage and improve your UX and bottom-line. It can be used for several purposes:
- Content Monitoring: Checking if specific text appears or disappears from web pages
- Error Detection: Looking for error messages or specific warning text
- Compliance: Ensuring required disclaimers or legal text remains present
- Competition Tracking: Monitoring competitor websites for specific product names or features
With Checkly, we can use Playwright to create monitors that verify content in these situations.
Picture this: you’ve got a successful eCommerce book store. Your best-sellers provide you with 100% of your operating revenue, and your long tail of products provides pure profit. Life is good. But suddenly users start reporting that they came to your shop looking for your best selling book, but couldn’t find it. You only have scattered reports, but by the time you’re investigating your sales, and your profits, are already slipping. Game over. To prevent this disaster scenario, we want to monitor our site constantly to make sure that our best-selling items are always visible, no matter how the site is updated.
Tl:dr this is the playwright code to check for a keyword on your page
await expect(page.getByText('KEYWORD')).toBeVisible()
If you want to see a real-world example, and how to handle cases like the keyword appearing multiple times, or allowing some variations, read on!
Creating a keyword assertion in Playwright
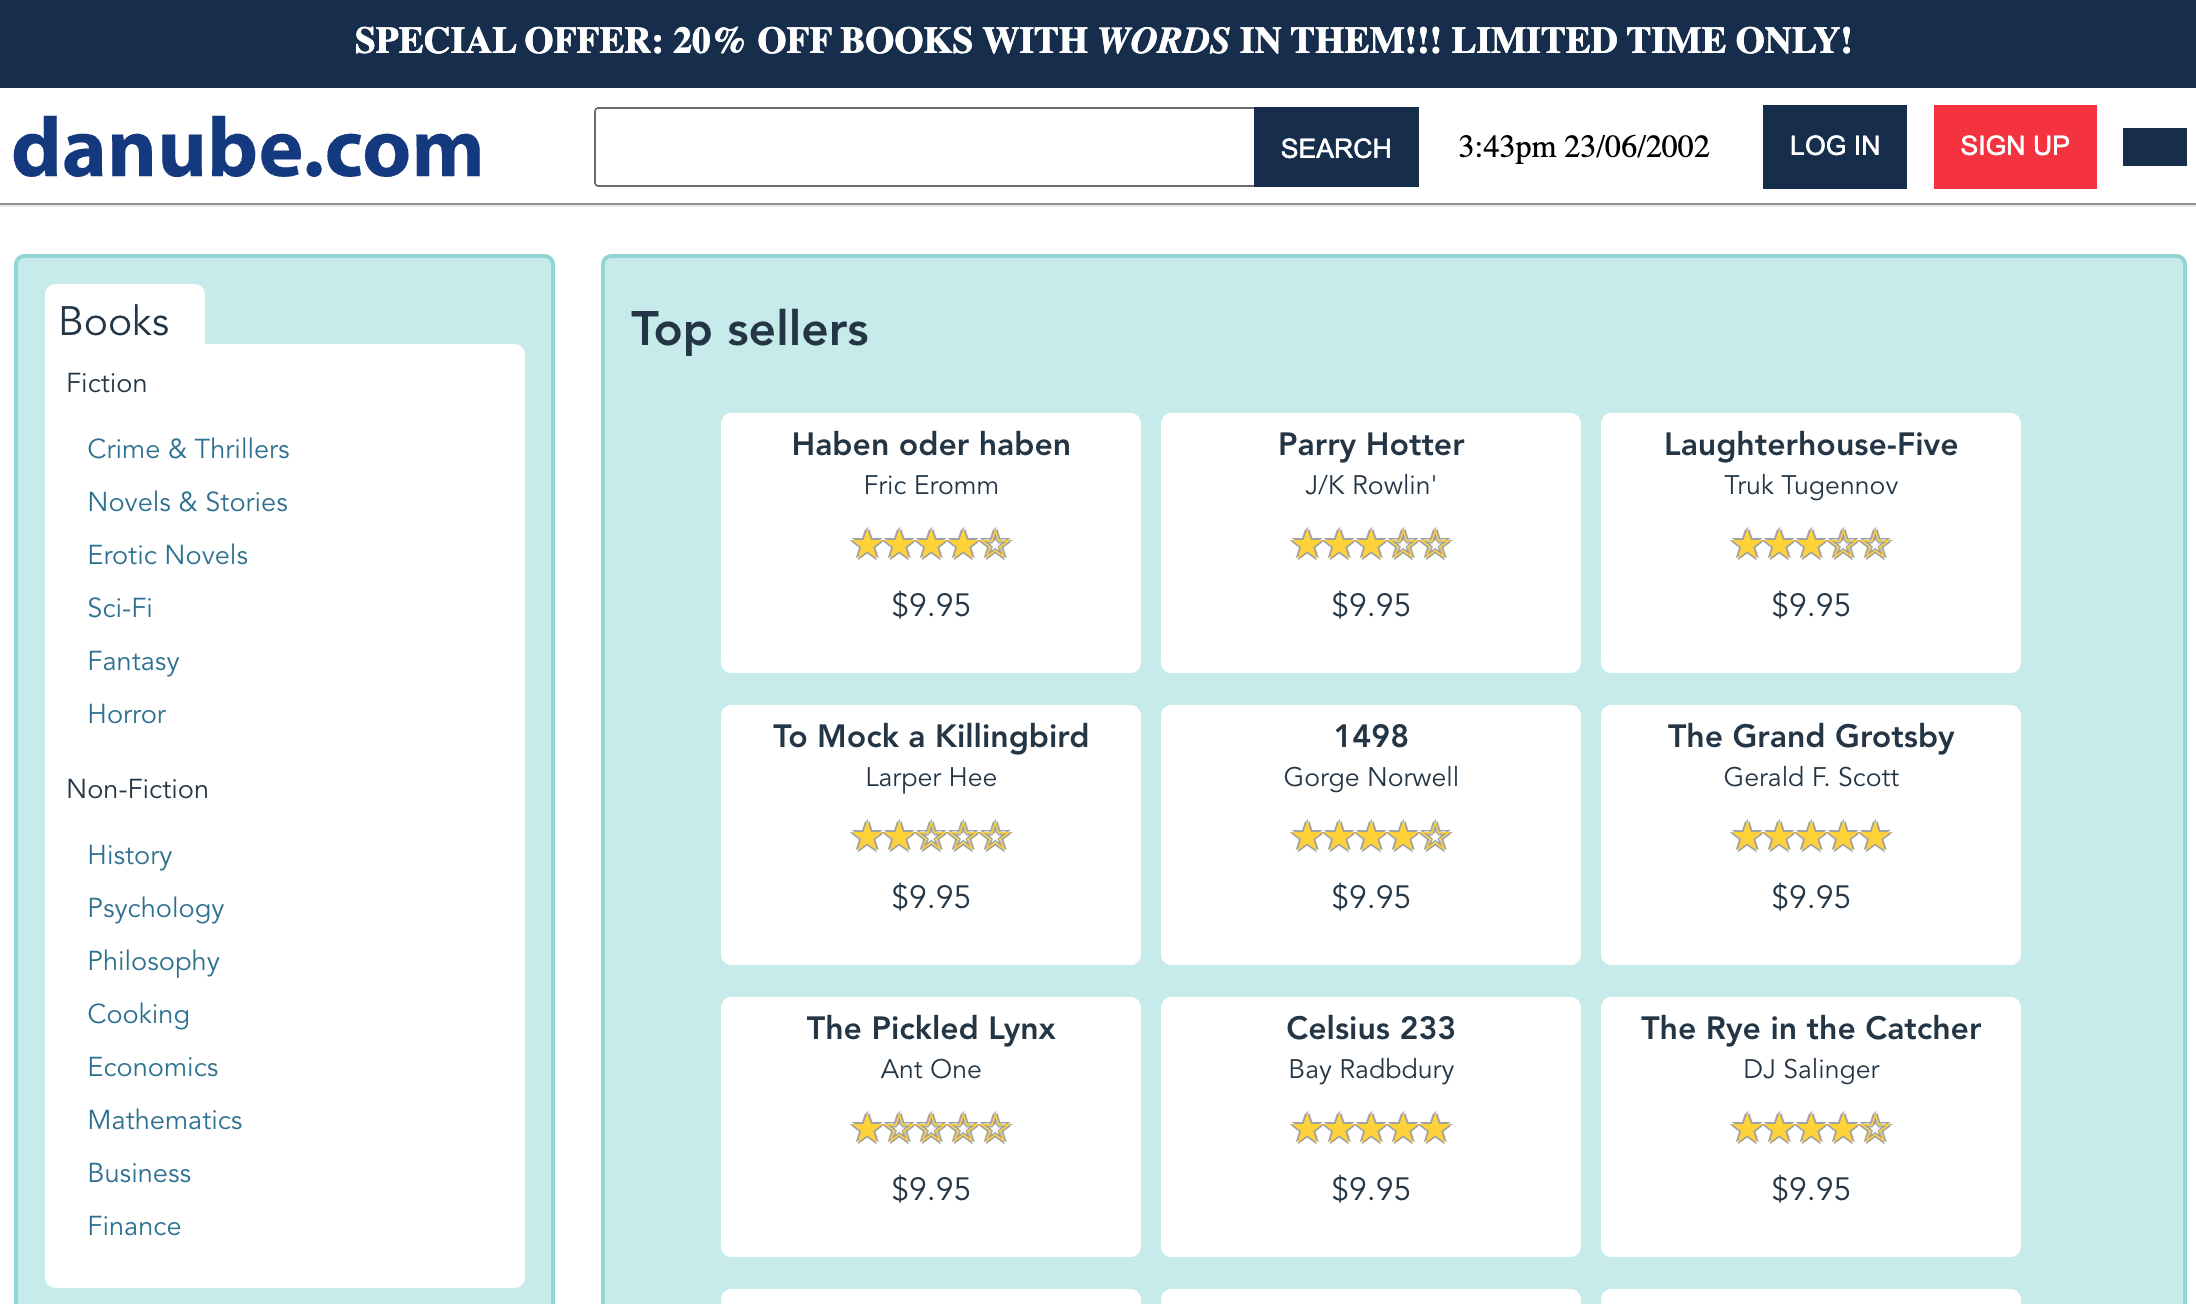
In this example from the Danube Web Shop, we need to make sure that ‘Haben oder haben’ is always visible. It’s not enough for the page to load, we need our best seller displayed at the top, so we’ll create an assertion looking for the keyword.
The code for this page monitor reads as follows:
const { expect, test } = require('@playwright/test')

test('Check for my best seller', async ({ page }) => {
  const response = await page.goto('https://danube-webshop.herokuapp.com/')
  await expect(page.getByText('Haben oder haben')).toBeVisible()
  await expect(page.getByText('9.95').first()).toBeVisible()
  // Take a screenshot
  await page.screenshot({ path: 'screenshot.jpg' })
})
This requires that an element somewhere on the page have the text KEYWORD. It makes no expectation of the element’s type, so it could be a button or a div or a span or anything else. Further, this doesn’t require that the complete text of the element be this, it could be a button that says ‘click here for Keyword’ and this test would pass. As a final note, getByText isn’t case sensitive so ‘Keyword,’ ‘KEYWORD’ or ‘KeYwOrD’ would all pass.
Configuring a keyword monitor in Checkly
Next, we’ll add this code to Checkly and set it up to monitor on a set frequency. We have two options for how to set up a page monitor with Checkly:
- Through the Checkly Web UI
- As a direct deployment with the Checkly CLI, implementing the monitoring as code model
While more advanced operations engineers and QA teams will probably prefer the second option, this guide will show you how to do everything you need from the web UI. If you’d like to know how to configure and deploy this monitor from the command line, see our documentation on the Checkly CLI.
Creating a page monitor in the Checkly web interface
With our test code from the section above, we can log in to checkly and create a new browser check, select an empty template, and paste in our code.
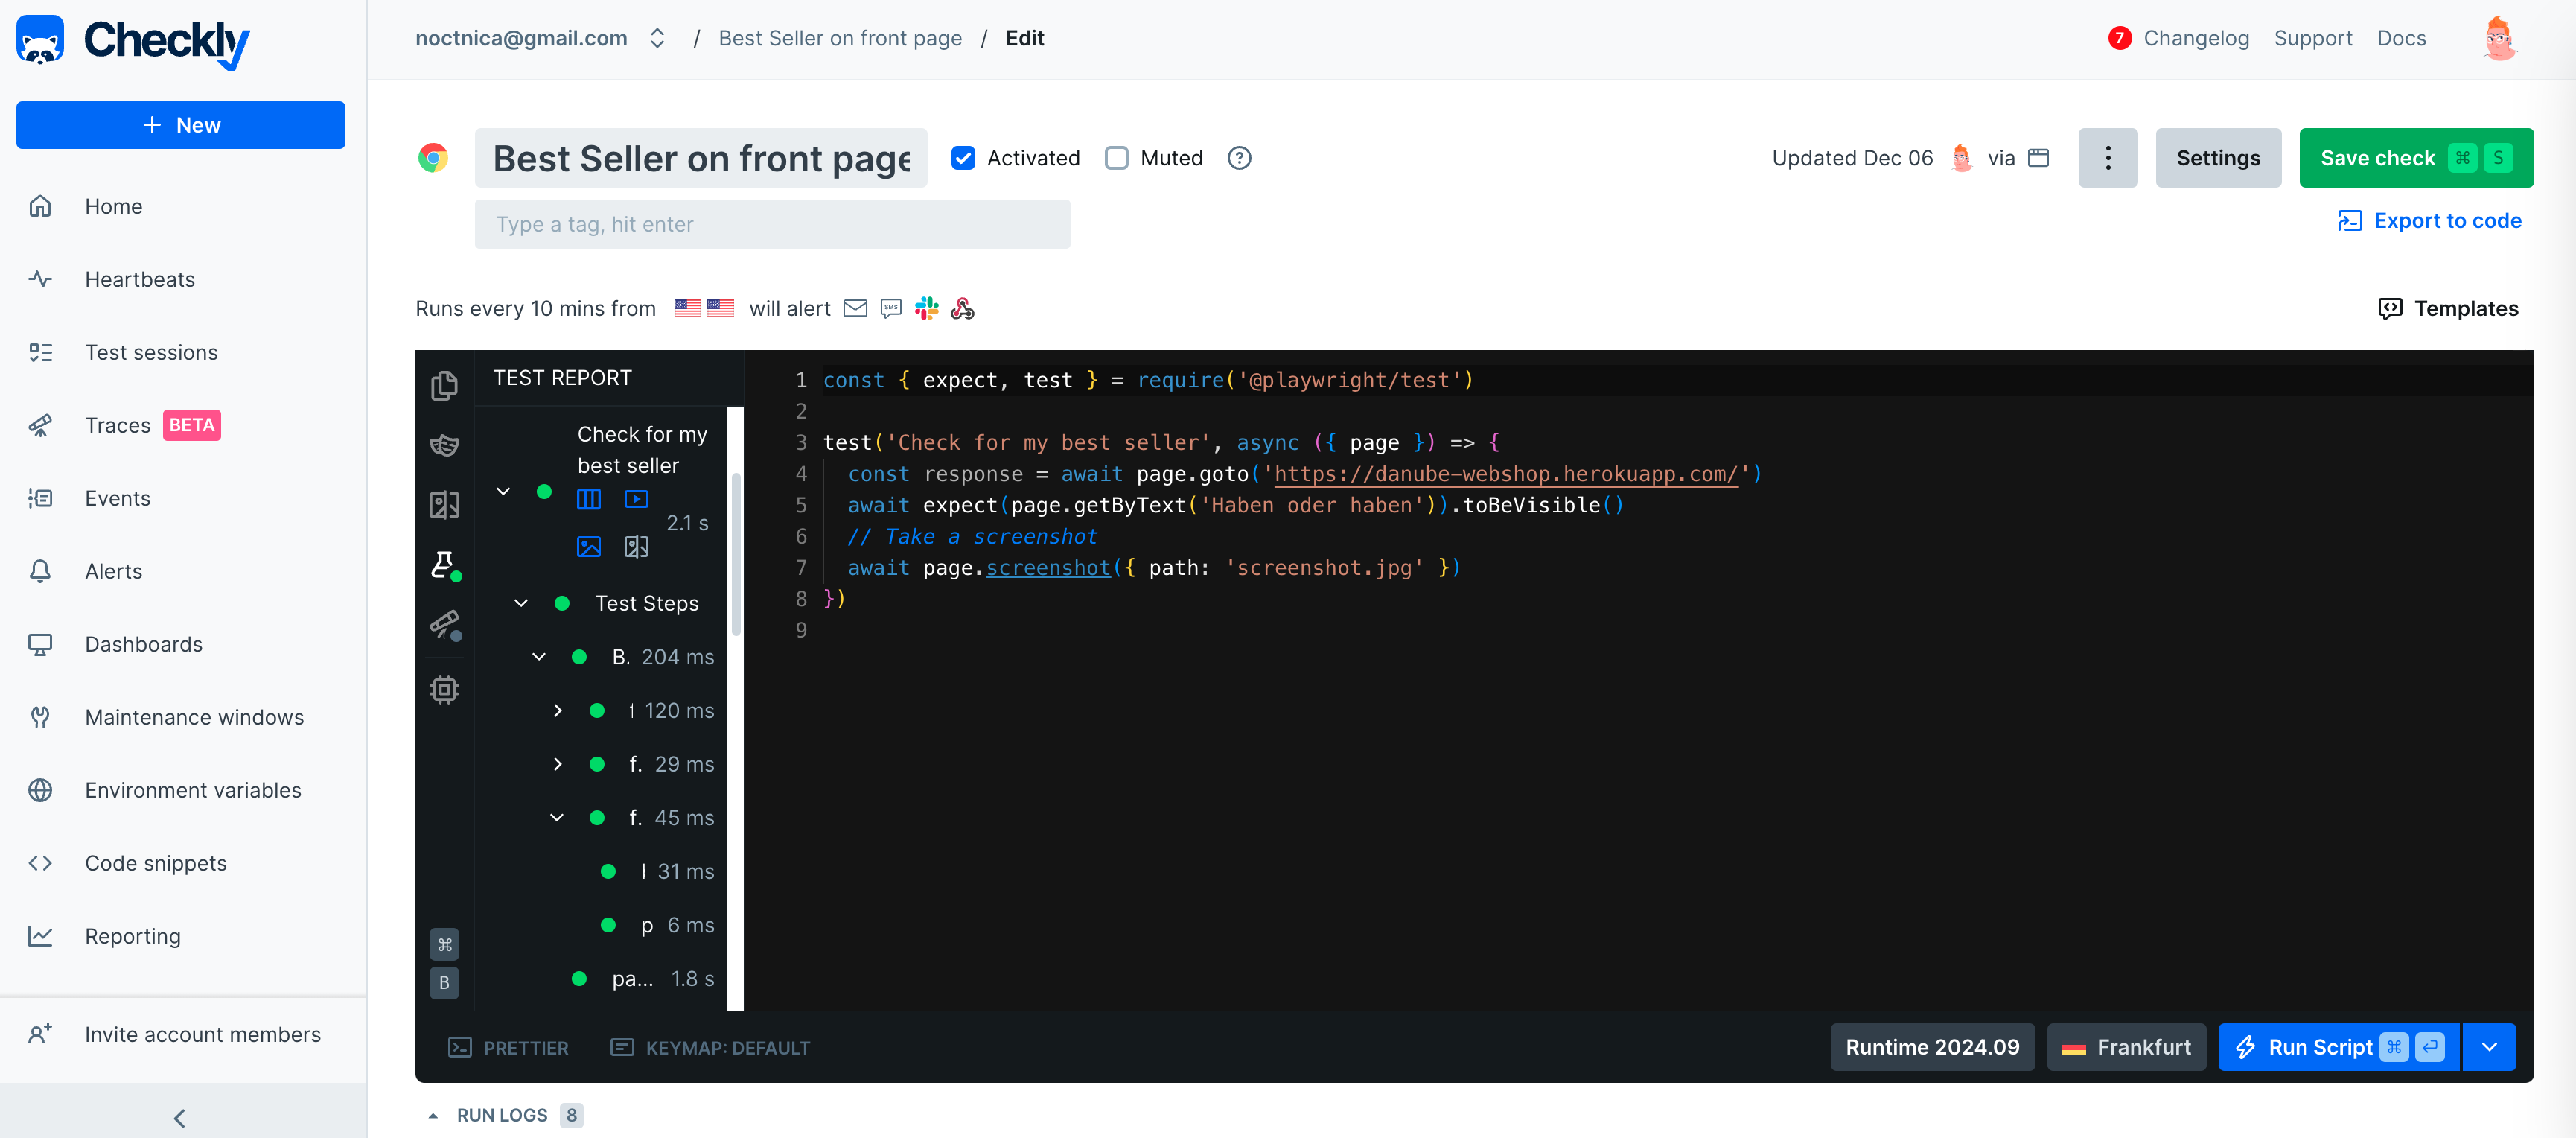
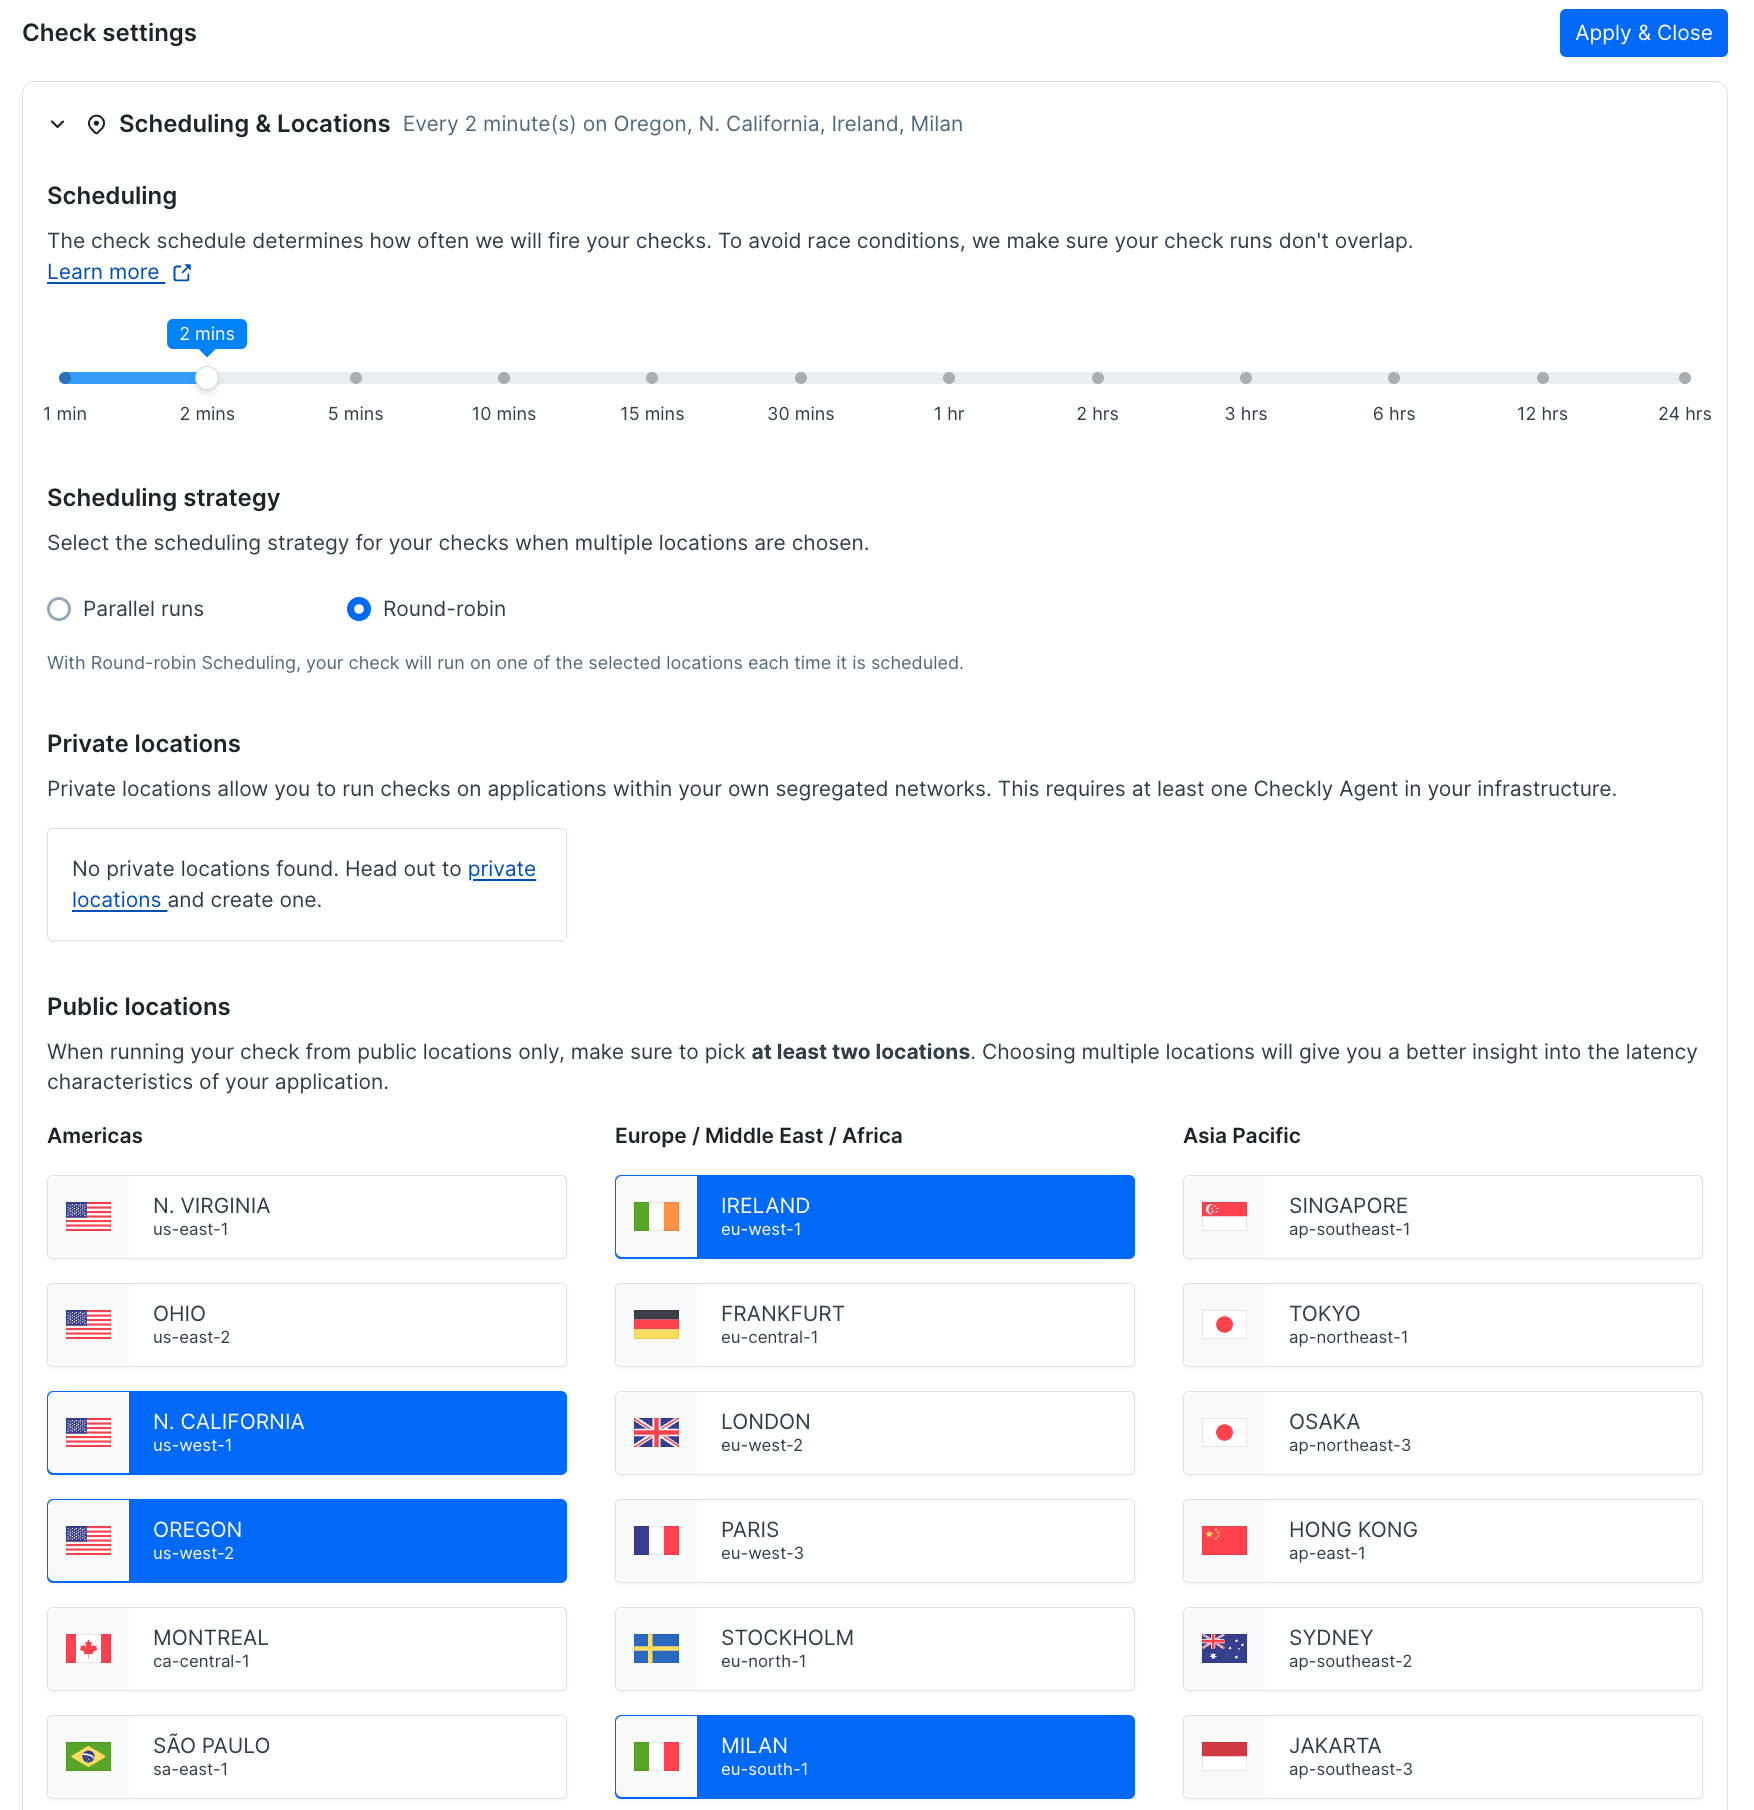
Next we’ll make some decisions about how frequently we want to run our check, under ‘Settings’ for our browser check.
- Since my ecommerce shop sees dozens of sales per minute, I’m going to set the frequency of runs to every 2 minutes.
- Since I have users in the US and Europe, I’ll select geographic locations there to run checks from.
- The failures I’ve experienced are rarely localized to one region, so I’ll select ‘round robin’ to run one check every 2 minutes from one of my geographic locations.
The final settings on frequency and locations will look like this:
Next I’ll make a few settings about how we want to retry our checks.
- A fleeting failure isn’t a big issue to me. If a single page load didn’t have the best seller for some reason, that’s fine as long as it’s there when you check again a minute later, so I’ll set the retry time to ‘linear,’ retrying 2 more times with a minute between them
- Finally I’ll use the global notification settings, and get notified via email, slack, SMS and a via a webhook to Rootly
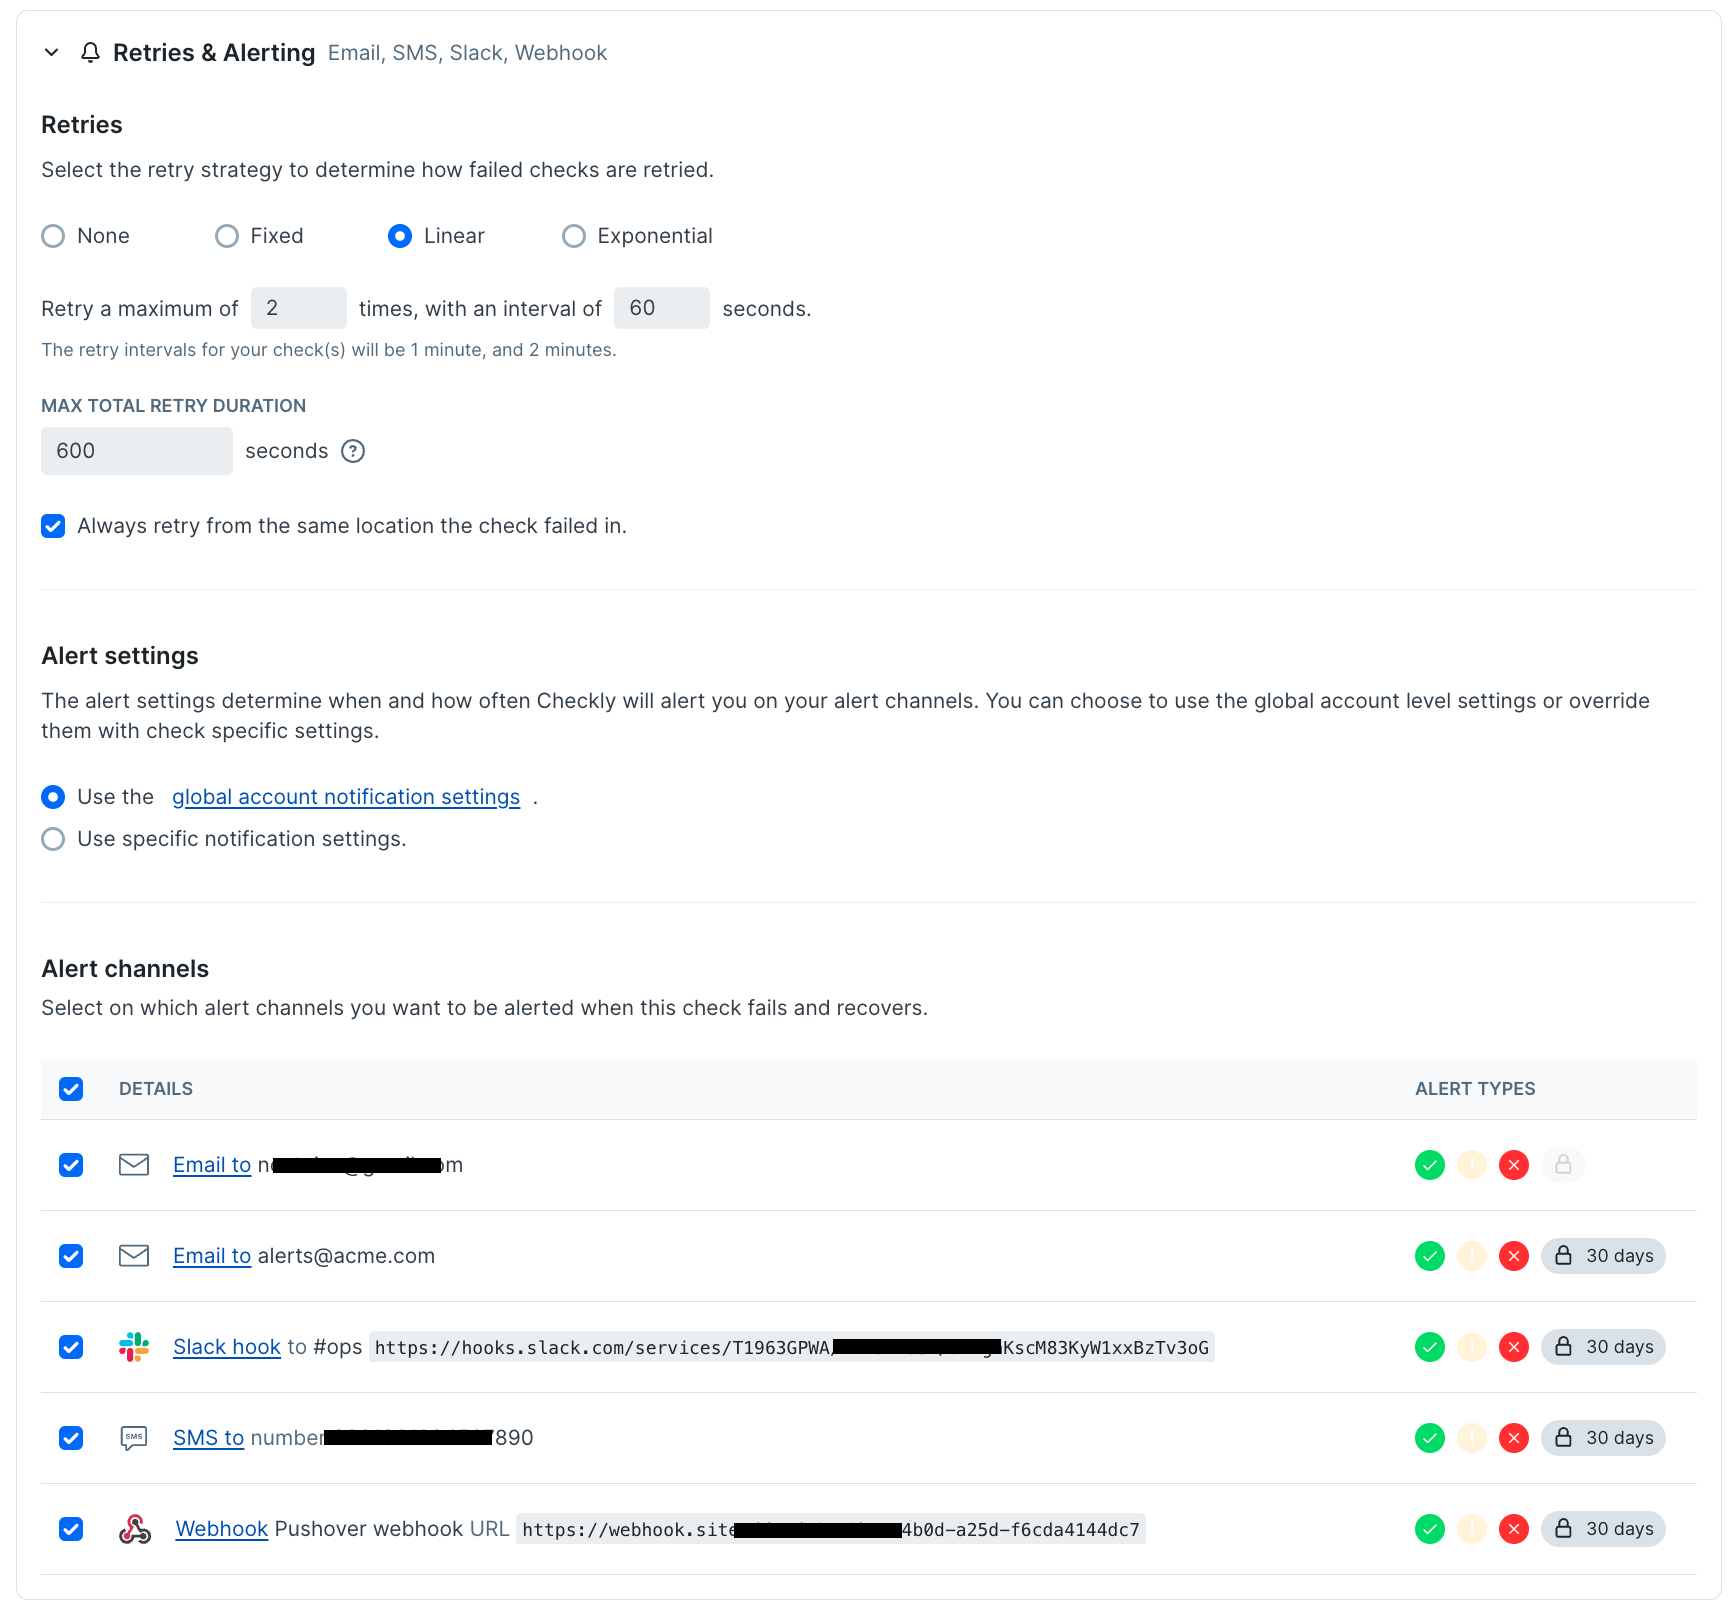
With these settings we can rest easy knowing that our users are seeing our best-selling items are visible for all visitors to our main page.
A complete code example to monitor for a keyword on your page.
The code above lacks the wrapper code to be run as a Checkly monitor, here’s a bare-bones example of that code:
const { expect, test } = require('@playwright/test')

test('Check for an element with text containing a keyword', async ({ page }) => {
  await page.goto('https://www.mysite-url.com/')
  await expect(page.getByText('keyword')).toBeVisible()
  // Take a screenshot of the current page
  await page.screenshot({ path: 'screenshot.jpg' })
})
If you’re unfamiliar with Playwright, you may be wondering why there’s no wait step after loading the page. Here as in so many page checks we benefit from Playwright’s auto-waiting feature, meaning the code will wait for the element to become visible, and then continue executing as soon as it does. This has a lot of advantages over any manual wait time, aka ‘hard waits’ that can make your page monitors both flakier and slower.
If you’d like to see the benefit of auto-waiting, run the script above from the Checkly editor with the ‘Run Script’ command at the bottom right, then take a look at the trace captured from this check run. The report viewer at the left is also where we can view the screenshot we captured with the last line of our check.
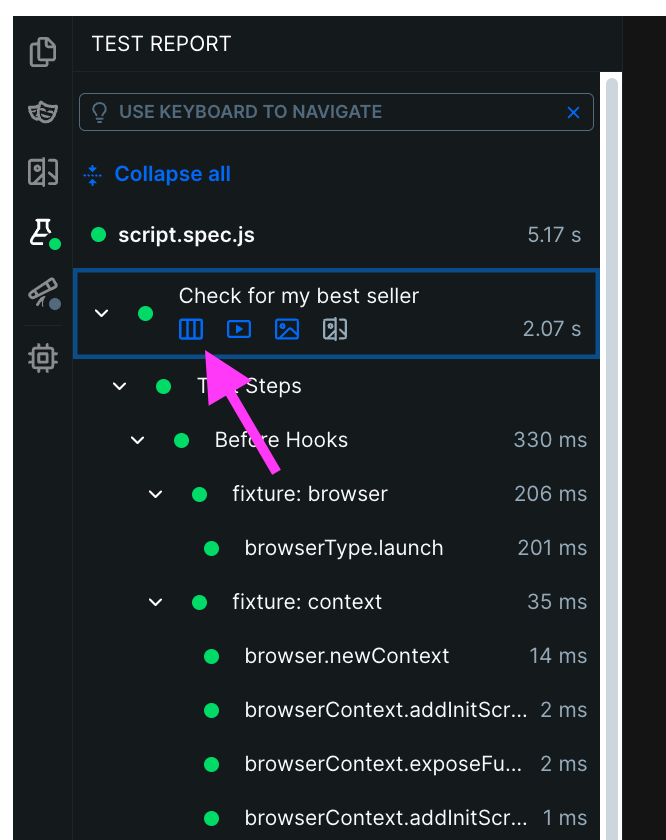
In the trace from this check run, we’ll see individual timings for:
- The page load
- When our target text was visible

In this case, the page load took 1.8 seconds, and only 33ms later, our best seller was visible. At that point the test was passed and we were able to move forward with our check. This saves execuction time compared to a manually added wait!
Narrowing text requirements: exact matching of keywords
If you want to find an element that has an exact match of the text we searched for, this is an option with the Playwright getByText method.
await expect(page.getByText('Keyword!', {exact: true})).toBeVisible()
Now the match will require that text is the exact text of the element, e.g. <span>Keyword!</span> and matching the capitalization.
Matching multiple elements with a keyword
Taking a look back at our storefront:
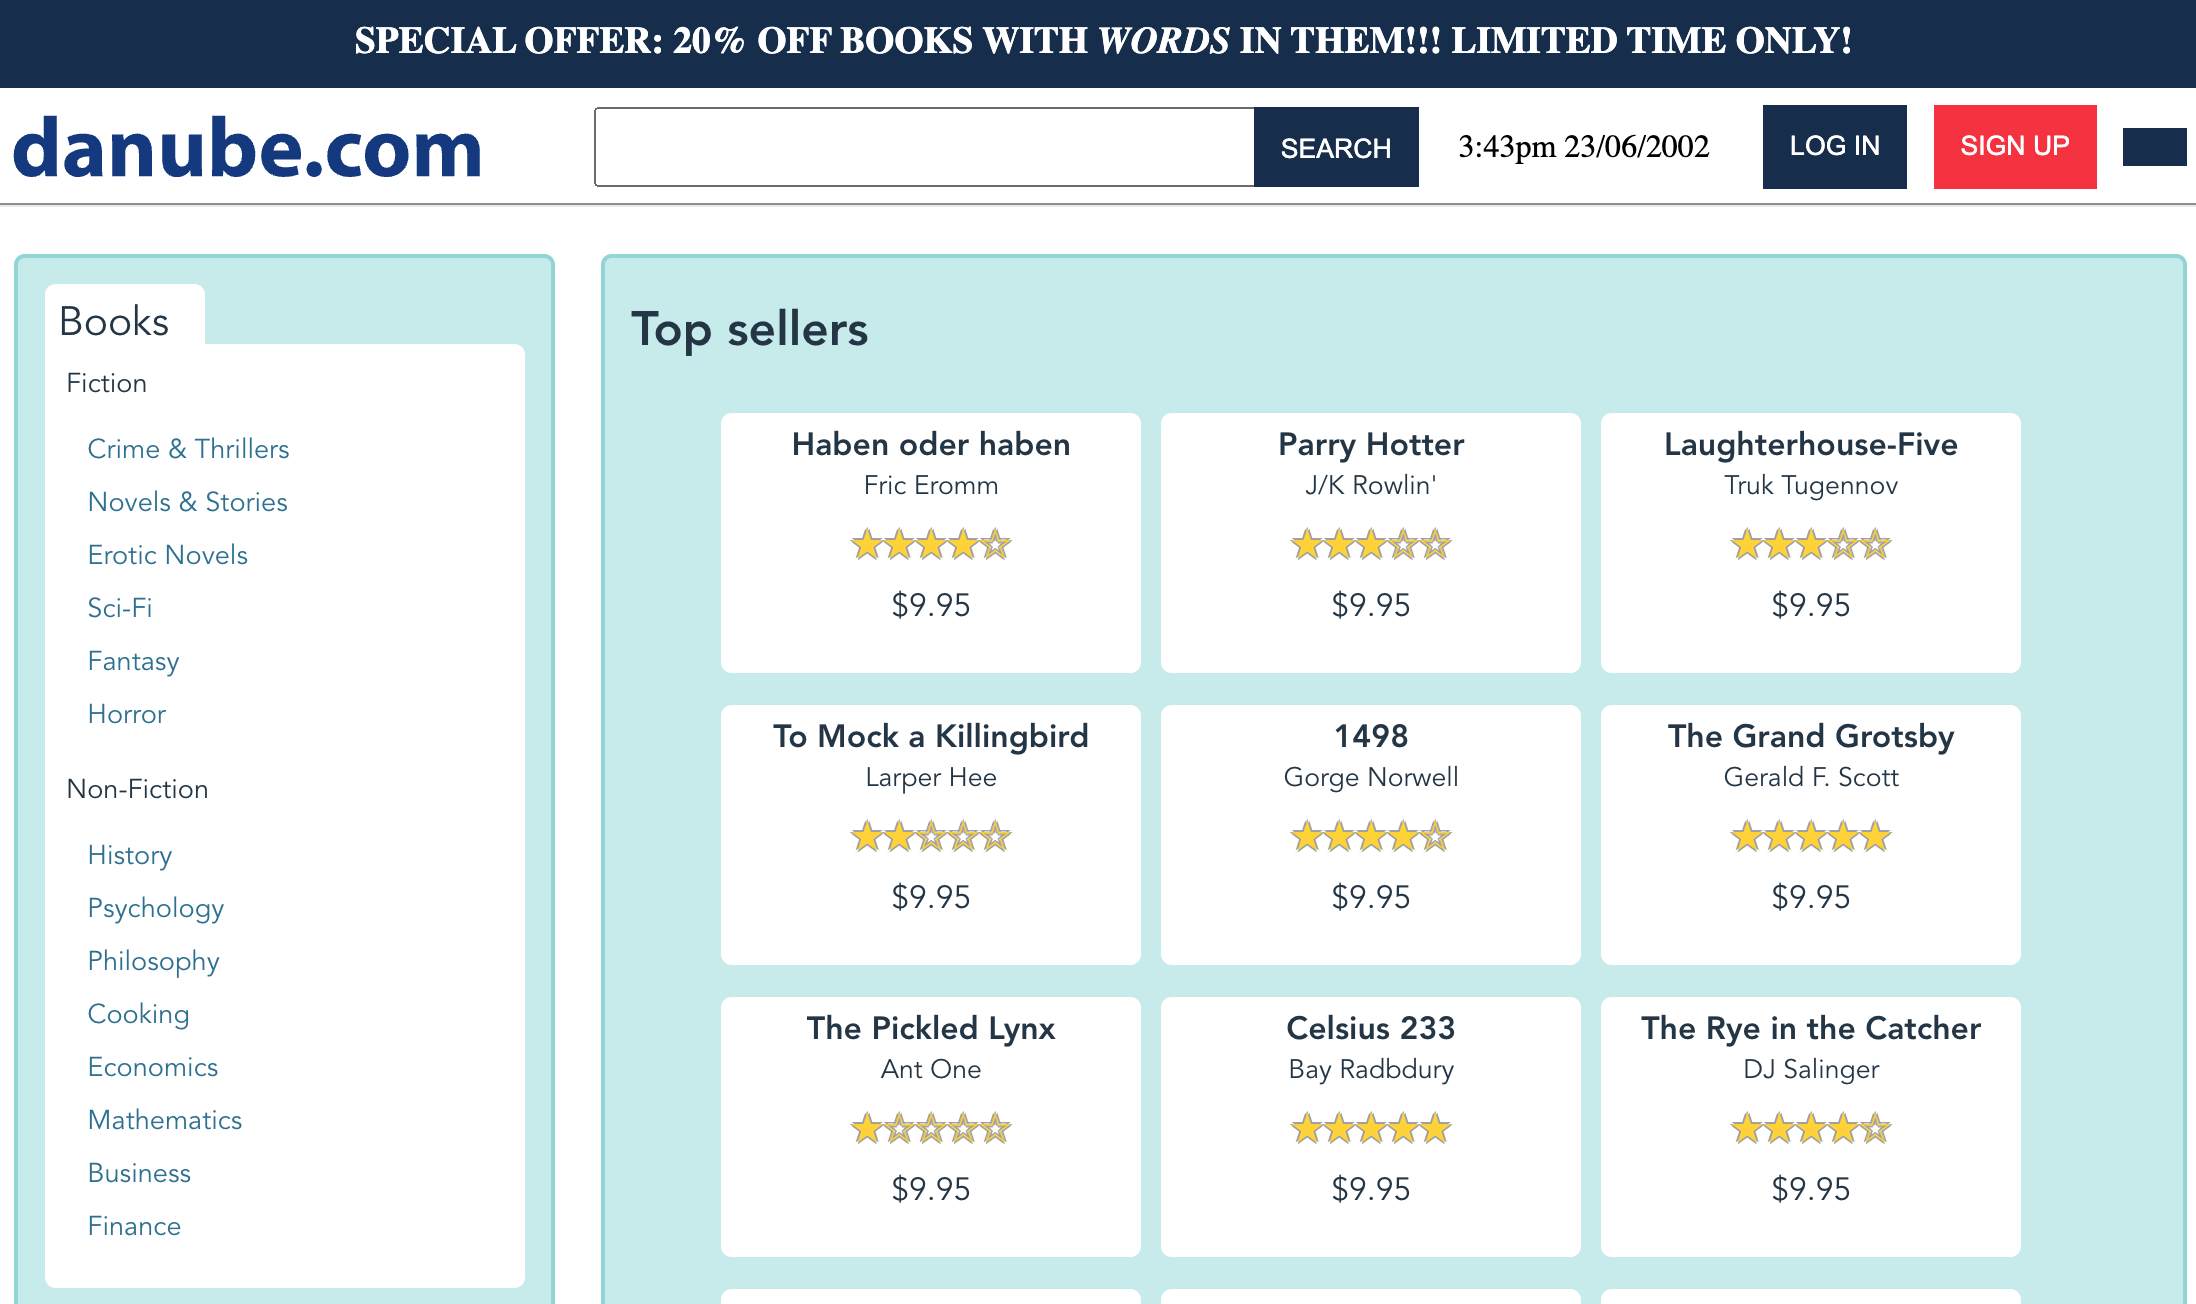
A number of strings are repeated in a few places (for example the word ‘Fiction’ or ‘$9.95’) and a keyword check for those using the code above will fail. If we change the assertion to be:
await expect(page.getByText('9.95')).toBeVisible()
We’ll get an error reading something like:
expect.toBeVisible: Error: strict mode violation: getByText('9.95') resolved to 30 elements
This isn’t a bug in Playwright, it’s just saying: ‘you wanted me to test something about an element, I found many elements that matched the parameters you gave me, so I don’t know which one you were talking about.’ For example, how would we evaluate this test if some of the matches were visible, but others weren’t? Since we can’t give a simple binary answer with multiple results, this check will fail.
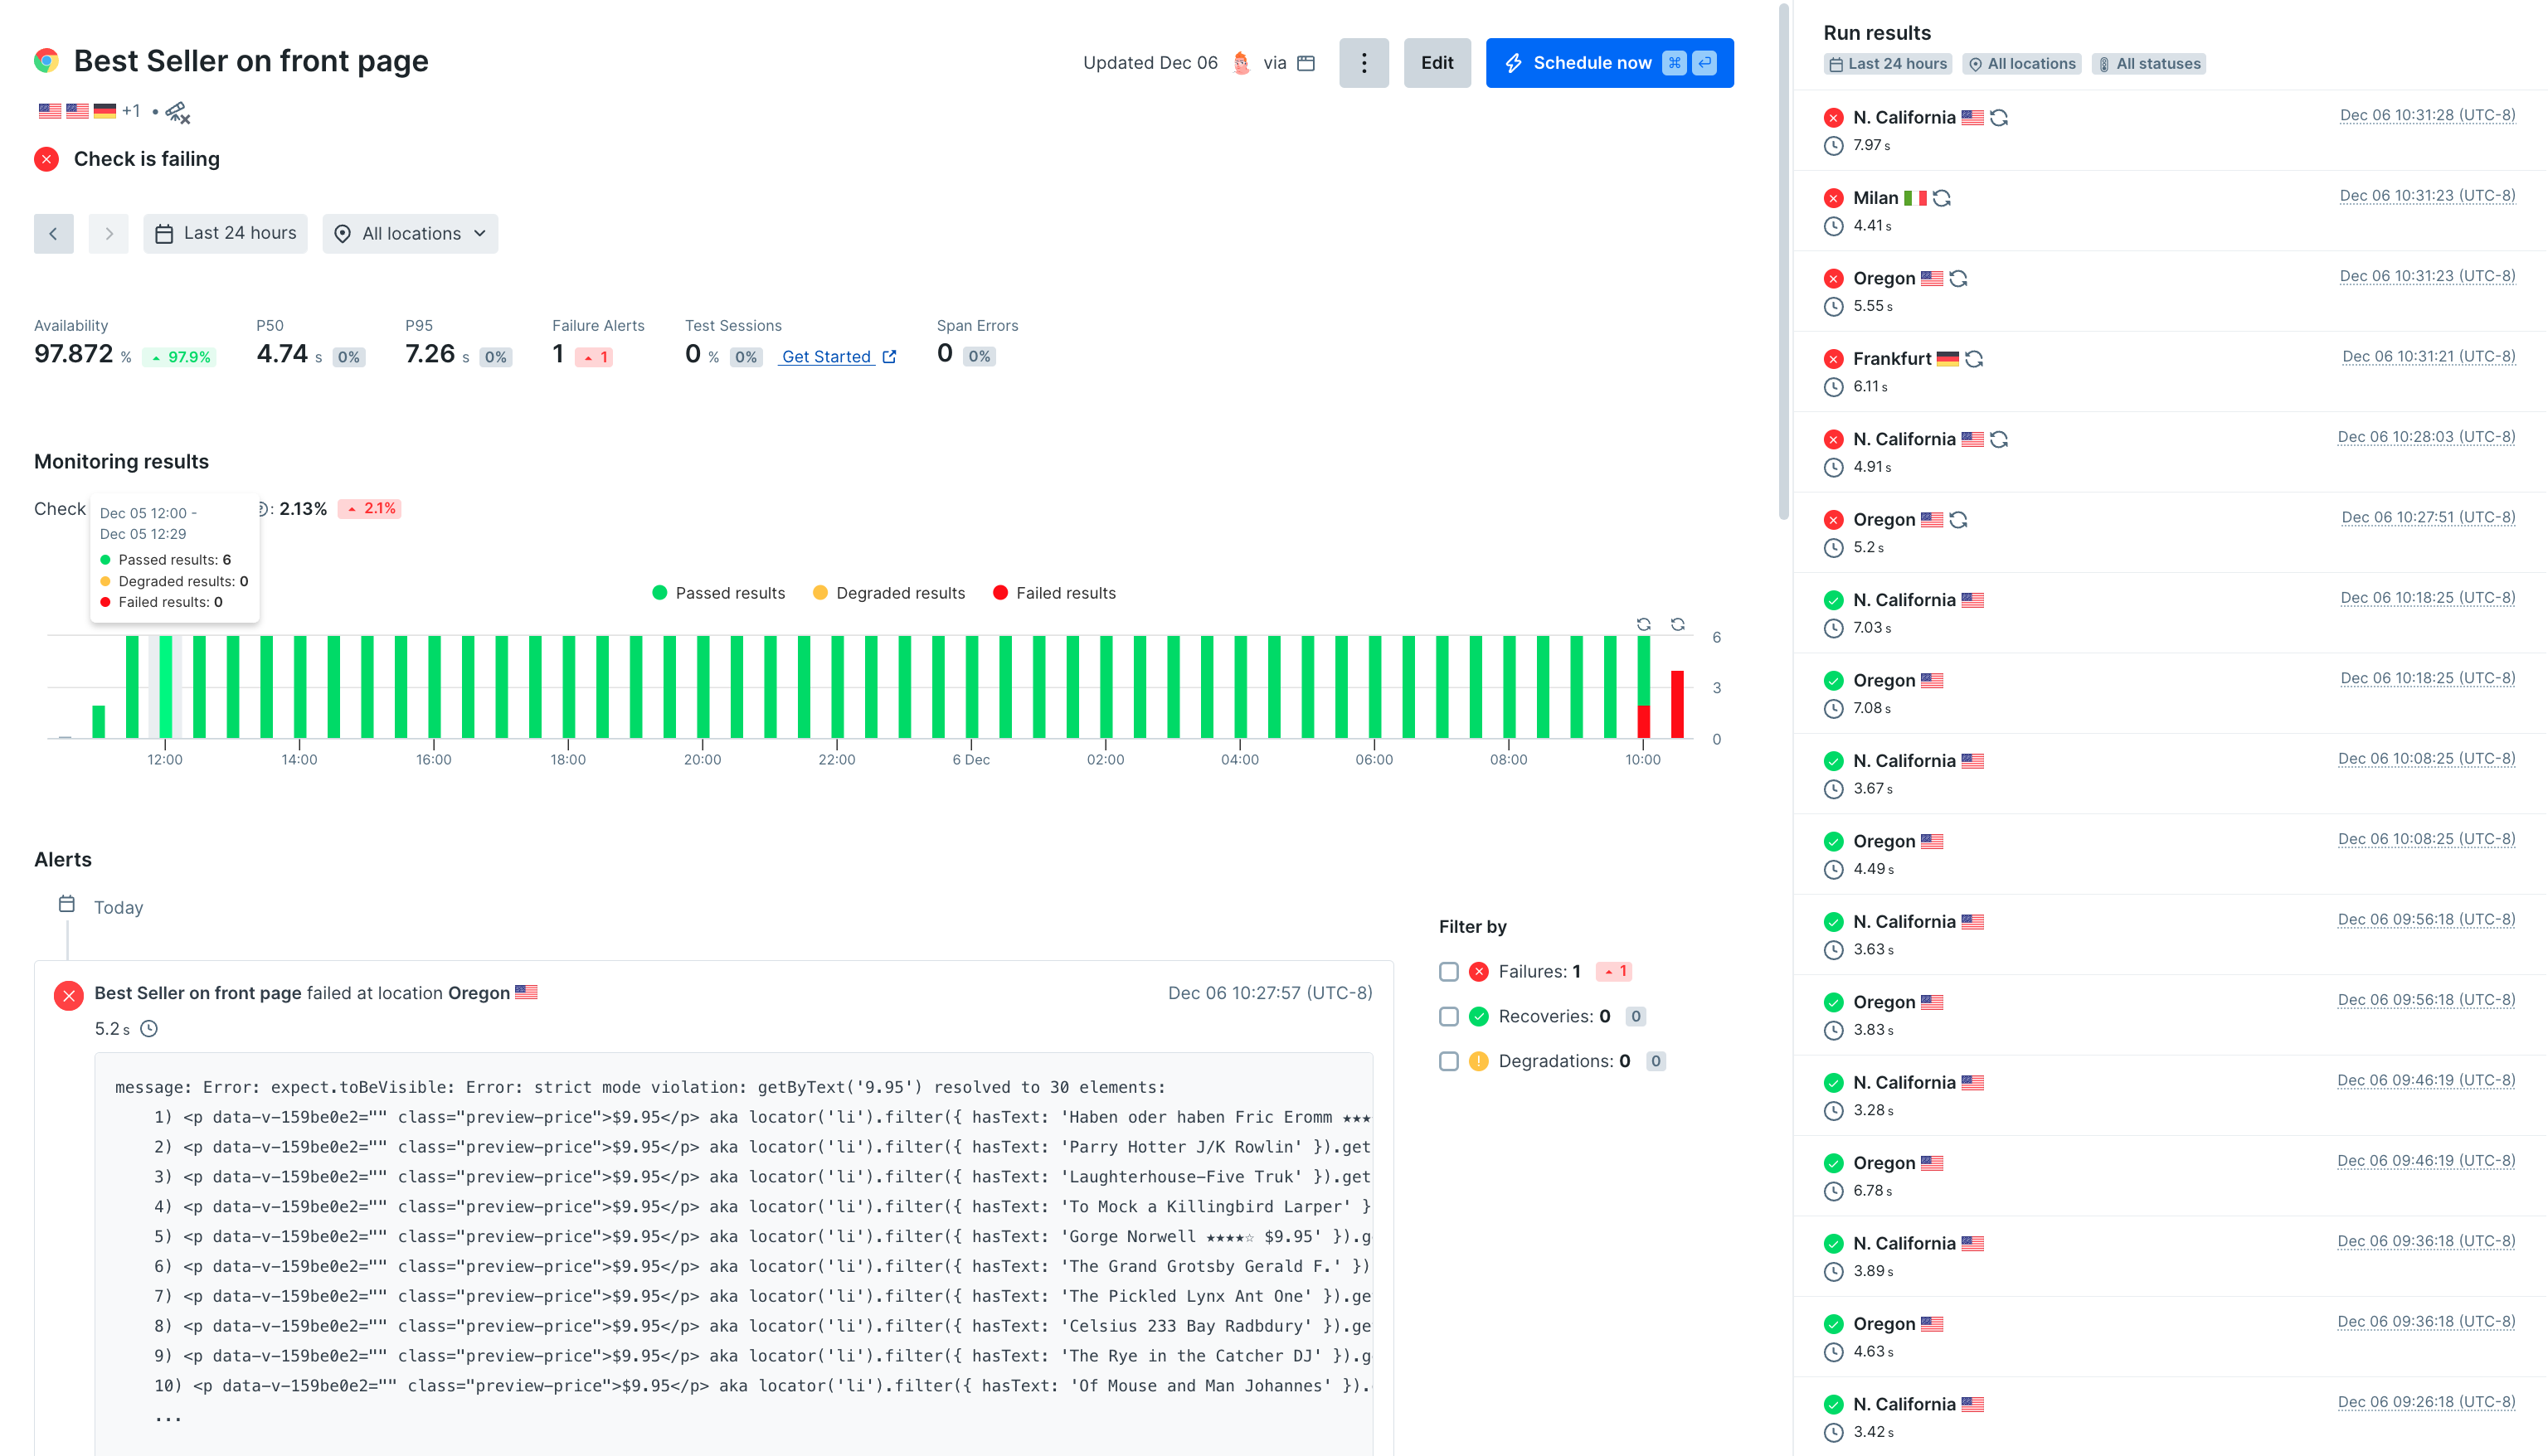
In our Checkly report for this monitor, we’ll get notified if this code starts matching multiple results, the monitor’s status will go to ‘failing’ and we’ll get a descriptive report about the error message received. In this case we’ll even get a list of the multiple elements that matched our page.getByText().
Solving strict mode violation when matching keywords
Tl;dr you can surpress all these resolved to [number] elements by only looking at the first result:
await expect(page.getByText('9.95').first()).toBeVisible()
When I’m writing my own page monitors with Checkly and Playwright, I often add .first() preemptively since I’m really only worried that the element appears somewhere and don’t care about multiple matches. However this may not make sense for every page monitor!
On the web shop above, the page has a top banner offering a sale. We may want to check if this banner is visible by doing a keyword monitor for the text in the banner, but it wouldn’t be good if this banner was showing up twice.

If our page looks like this, something has gone wrong!
For page components like banners, CTA’s, and login buttons, it may make sense to have our monitor fail if we have multiple matches.
Checking for multiple possible keywords
In another scenario, we might be checking to make sure that each page has a ‘sign up’ call to action somewhere on the page. We start with an assertion like:
await expect(page.getByText('sign up')).toBeVisible()
But it turns out the marketing team keeps rewriting the call to action on various pages, using ‘create an account’ and ‘register your account’ in various places. We’d like to monitor pages to make sure any variation is present in the page. We might spend a minute exploring something like soft assertions, but that’s really not the use case for soft assertions. No, what we want is something like the logical ‘inclusive OR’ that returns a passing check when any of these possible strings is present.
Checking for keywords with a regular expression
almost any place an assertion or locator is taking a string within Playwright, a regex pattern can also be used.
await expect(page.getByText(/Sign up|register/)).toBeVisible()
note that by default in Playwright, patterns are run without the /i config, meaning they will be case sensitive. When I first went to write the example above I used /sign up|register/ and it failed. Made more confusing since the text on the page has text-transform:uppercase 🤣
Regex can be quite useful for detailed matching. For example, if I only want to accept correct capitalization I could write:
await expect(page.getByText(/[Ss]ign [Uu]p|[Rr]egister/)).toBeVisible()
so that ‘sIGn uP’ would also cause the monitor to fail. Of course with regular expressions the sky is the limit for what we can match!
Checking for multiple conditions with .or()
Since we can return multiple matches on a Playwright locator with .or() the other way to match on multiple keywords is with a check like this:
const { expect, test } = require('@playwright/test')

test('visit page and take screenshot', async ({ page }) => {
  const response = await page.goto('https://danube-webshop.herokuapp.com/')
  await expect(
    page.getByText('sign up')
      .or(page.getByText('register'))
  ).toBeVisible()

  // Take a screenshot
  await page.screenshot({ path: 'screenshot.jpg' })
})
Note that, since we’re now explicitly giving multiple locators, it would be a good idea to add .first() so our test will not fail with multiple matches, and examine the first item found for further check conditions:
  await expect(
    page.getByText('sign up')
      .or(page.getByText('register'))
      .first()
  ).toBeVisible()
Putting it all together: complete Playwright and Checkly Code for Keyword Monitoring
Let’s cover the case where we want to make sure that users see a ‘sign up’ button on the page we’re checking.
//best-seller-on-front-page.spec.ts
const { expect, test } = require('@playwright/test')

test('Check for my best seller', async ({ page }) => {
  const response = await page.goto('https://danube-webshop.herokuapp.com/')
  await expect(page.getByText('Haben oder haben')).toBeVisible()
  await expect(
    page.getByText('sign up')
      .or(page.getByText('register'))
  ).toBeVisible()
  // Take a screenshot
  await page.screenshot({ path: 'screenshot.jpg' })
})
Previously we’ve used the Checkly web UI to make our settings to this page monitor, but as you monitor a production site you’ll want to consider adopting a monitoring as code strategy where your page monitors and their configuration are stored in a code repository. In that case the same configuration described in a previous section would be stored in a config file:
//best-seller-on-front-page.check.ts
import { BrowserCheck, Frequency, RetryStrategyBuilder } from 'checkly/constructs'

new BrowserCheck('best-seller-on-front-page', {
  name: 'Best Seller on front page',
  activated: true,
  muted: false,
  shouldFail: false,
  runParallel: false,
  runtimeId: '2024.09',
  locations: ['us-west-2', 'us-west-1', 'eu-central-1', 'eu-south-1'],
  tags: [],
  sslCheckDomain: '',
  frequency: Frequency.EVERY_2M,
  environmentVariables: [],
  code: {
    entrypoint: './best-seller-on-front-page.spec.ts',
  },
  retryStrategy: RetryStrategyBuilder.linearStrategy({
    baseBackoffSeconds: 60,
    maxRetries: 2,
    maxDurationSeconds: 600,
    sameRegion: true,
  }),
})
Conclusion
Keyword-based monitoring with Checkly and Playwright is a simple but effective way to ensure critical content on your site remains accessible and visible, even as updates or unexpected issues arise. From best-sellers in an ecommerce store to key calls-to-action on landing pages, monitoring for specific text gives you peace of mind that your users are seeing the information they need.
By configuring Checkly to run frequent, geographically distributed checks and customizing retry strategies, you can detect and respond to potential issues before they impact your business. Whether you’re working with a simple keyword, exact matches, or complex conditions using; the flexibility of Playwright ensures you can tailor your tests to fit any use case.
Combined with a monitoring as code approach, you can maintain consistency and version control over both your tests and their configurations. With these tools in place, you’re well-equipped to keep your site reliable and your customers satisfied.